Fabric.js Tutorial Part 1
Posted by Al Sweigart in misc
This is part 1 my tutorial series on the Fabric.js canvas/graphics library for JavaScript, where we learn about drawing basic shapes like rectangles, circles, and triangles to draw pine trees.
What is Fabric.js?
Fabric.js is a JavaScript library that makes drawing on HTML5 <canvas> elements easier than using the native Canvas API. This Fabric.js tutorial emulates the format of Hunor Márton Borbély's SVG Tutorial at svg-tutorial.com: short demonstrations that you can enter into a text editor and view in your local browser.
I dislike code snippets that you can't actually run yourself on your own computer with modification. I will always give you the complete HTML for each example that you can copy and open in your browser on your computer. There are no missing sections or "leave it to the reader" omissions. Furthermore, the Fabric.js examples on each page are live examples and not just screenshots. I also provide JSFiddle links with the example code for you to modify.
The Fabric.js website has tutorials, documentation, and a gallery of examples but you won't need to consult that site to follow this tutorial series. This tutorial does assume you have basic HTML and JavaScript knowledge.
Drawing Rectangles and Circles
Let's create a small example with red and blue rectangles on a <canvas> element that will look like this:
In Fabric.js, you draw basic shapes by creating shape objects with JavaScript code. You can also write text, load images, and apply image filters, but we'll explore that later. You can see the complete code for this example on its own page at fabric-js-rects-and-circle.html. Right-click the page and select "View Source" to view the HTML and JavaScript code. You can also view this code on JSFiddle.
Notice that you can drag the objects around the canvas as well as scale and rotate them. This feature is automatically provided by Fabric.js. To disable this, replace the fabric.Canvas() code (we'll see this in the next section) with fabric.StaticCanvas(), as in this output where you can't move the shapes around:
Notice that for objects added to the static canvas, you cannot select them and move them around.
Let's look at each part of the HTML and JavaScript individually:
<!DOCTYPE html>
<html lang="en">
<head>
  <title>Fabric.js Rects and Circle</title>
  <meta charset="utf-8" />
  <meta name="viewport" content="width=device-width, initial-scale=1.0">
  <script src="https://cdnjs.cloudflare.com/ajax/libs/fabric.js/5.3.1/fabric.js"></script>
</head>
This is some standard HTML boilerplate for a basic web page header. I'm loading the Fabric.js library from a free CDN (Content Distribution Network) provided by Cloudflare, but you can put the fabric.js file on your own web host and link to it instead. This tutorial uses Fabric.js version 5.3.1. The CDN also provides a minified version for faster loading if you change the filename to fabric.min.js in this URL.
<body>
  <!-- The HTML <canvas> element: -->
  <canvas id="mainCanvasId" width="400" height="400" style="border: 1px solid black;"></canvas>
</body>
The <canvas> element is the area where the drawing takes place. You can think of it as a <img> element but its contents come from JavaScript code instead of an image file. Instead of using the native Canvas API to do the drawing, you can use Fabric.js's API. I've given this <canvas> element a width and height of 400 pixels, as well as a thin black border for easier viewing.
<script>
// Create a Fabric.js "Canvas" object that is tied to the HTML <canvas> element:
let canvasObj = new fabric.Canvas('mainCanvasId');
First, create a new Canvas object by passing fabric.Canvas() the id of the <canvas> element, 'mainCanvasId'. This is necessary since there could be multiple <canvas> elements on the web page.
// Create a Fabric.js "Rect" object that represents a rectangle:
let rectObj = new fabric.Rect({
  left: 100, top: 50, fill: 'red', stroke: 'blue', width: 80, height: 30
});

// The rectangle won't appear on the canvas until it is added:
canvasObj.add(rectObj);
We'll draw a rectangle by creating a Rect object. Pass a JS object with keys 'left' and 'top' for the X and Y coordinate of the left and top edge of the rectangle. The interior fill color for this rectangle will be red and the outline stroke will be blue. The size of the rectangle is 80 pixels wide and 30 pixels tall. (Remember that we made the total size of the <canvas> element 400 x 400.)
You won't see this rectangle on the canvas until you call the Canvas.add() method with the Rect objects.
// Create a second rectangle:
let rectObj2 = new fabric.Rect({
  left: 50, top: 100, fill: 'green', width: 50, height: 50
});

canvasObj.add(rectObj2);
We'll create a second rectangle, this time with a green fill and size of 50 pixels by 50 pixels.
// Create a circle:
let circleObj = new fabric.Circle({
  // Note that the radius is half the width of the circle.
  radius: 100, fill: '#FF00FF', left: 200, top: 200
});

canvasObj.add(circleObj);
</script>
The Circle object must be added to the Canvas object the same way the Rect objects are, or you will not see them on the canvas. Note that objects added to the canvas most recently are on top of any objects added earlier.
Next, let's create a magenta circle with a radius of 100 pixels by calling the fabric.Circle() function. The fill property in the object passed to this function is set to '#FF00FF', an HTML RGB code for maximum red, no green, and maximum blue to produce magenta. Notice that the position of the circle is set by its left and top edge location. If you want to position the circle by supplying its center X and Y coordinates, include originX: 'center', originY: 'center' in the object passed to fabric.Circle(). Somewhat confusingly, the left and top parameter names will now set the center position of the shape instead of the left and top edge.
For example, changing the code to let circleObj = new fabric.Circle({radius: 100, fill: '#FF00FF', left: 200, top: 200, originX: 'center', originY: 'center'}); will make the canvas look like this:
Note that forgetting to set either the width or height in fabric.Rect() or the radius in fabric.Circle() will cause that shape to not render on the canvas. There will be no error in the browser's developer console to indicate that an error has occured; the shape will simply not appear.
Review:
- Put
<script src="https://cdnjs.cloudflare.com/ajax/libs/fabric.js/5.3.1/fabric.js"></script>in your HTML file to load the Fabric.js library from a free CDN. - Create the <canvas> element with
<canvas id="mainCanvasId" width="400" height="400" style="border: 1px solid black;"></canvas> - The code
let canvasObj = new fabric.Canvas('mainCanvasId');creates aCanvasobject. - The code
let rectObj = new fabric.Rect({
  left: 100, top: 50, fill: 'red', stroke: 'blue', width: 80, height: 30
});
creates a rectangle. - The code
let circleObj = new fabric.Circle({radius: 100, fill: '#FF00FF', left: 200, top: 200});creates a circle. Instead ofwidthandheight, it has aradius. - You must call
canvasObj.add(rectObj);to make a shape actually appear on the canvas; creating it is not enough. - When creating a new shape, you can set
originXtoleft,center, orrightand setoriginYtotop,center,bottomto change which point on the shape theleftandtopproperties set. (However, these properties will still confusingly be namedleftandtop.) - If a shape doesn't appear on the canvas, check that you remembered to supply a
widthandheightproperty (for rectangles) or aradiusproperty (for circles). Theleftandtopproperties may also have the position of the shape outside the view of the canvas.
Project: Draw a Pine Tree
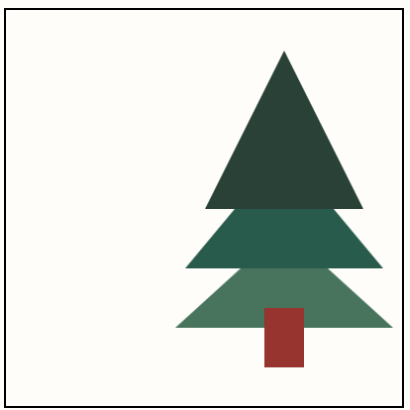
Let's draw a pine tree with the fabric.Triangle shape. We'll create this tree out of three triangles and one rectangle:
The full code is at fabric-js-pine-tree.html or on JSFiddle. Let's examine each part individually:
<!DOCTYPE html>
<html lang="en">
<head>
  <title>Fabric.js Pine Tree</title>
  <meta charset="utf-8" />
  <meta name="viewport" content="width=device-width, initial-scale=1.0">
  <script src="https://cdnjs.cloudflare.com/ajax/libs/fabric.js/5.3.1/fabric.min.js"></script>
</head>

<body>
  <!-- The HTML <canvas> element: -->
  <canvas id="treeCanvasId" width="200" height="200" style="border: 1px solid black;"></canvas>
</body>
This is the standard boilerplate HTML for a web page. Note that the ID we use for the <canvas> element is treeCanvasId and it is a 200 x 200 pixels in size.
<script>
// Create a Fabric.js "Canvas" object that is tied to the HTML <canvas> element:
let canvasObj = new fabric.Canvas('treeCanvasId');

let branches1 = new fabric.Triangle({
  width: 80, height: 80, fill: '#234236', left: 100, top: 20
});

let branches2 = new fabric.Triangle({
  width: 100, height: 60, fill: '#0C5C4C', left: 90, top: 70
});

let branches3 = new fabric.Triangle({
  width: 110, height: 50, fill: '#38755B', left: 85, top: 110
});
First, we need a fabric.Canvas object to be the Fabric.js representation of the HTML <canvas> element. Then branches of our pine tree will be green triangles that we create by creating fabric.Triangle objects. These isosceles triangles point upwards, but we'll learn how to rotate them in the next tutorial part.
Note that the size and position are given the same way as fabric.Rect rectangles: width, height, left, and top. We don't specify a triangle's shape and size by specifying three pairs of X and Y coordinates. (For this kind of triangle, we'd use the fabric.Polygon shape that we'll cover in later tutorial parts.) We color them with different shades of green: #234236, #0C5C4C, and #38755B.
let stump = new fabric.Rect({
  width: 20, height: 30, fill: 'brown', left: 130, top: 150
});
The brown stump will be a rectangle created with a fabric.Rect object.
canvasObj.add(branches3);
canvasObj.add(branches2);
canvasObj.add(branches1);
canvasObj.add(stump);
</script>
We've created these four shape objects, but they won't appear on the canvas until after we call the add() method. I want the top branches (in branches1) to appear on top of the other triangles, so I need to add it last.
Review:
- The
fabric.Triangleshape draws isoceles triangles pointing upwards withlet branches1 = new fabric.Triangle({width: 80, height: 80, fill: '#234236', left: 100, top: 20}); - The order that the shapes are created doesn't matter, rather the first shapes added with
add()will be on the bottom of the canvas underneath shapes added later.
This tutorial continues on to Part 2. Special thanks to Hunor Márton Borbély for the SVG tutorial that inspired this Fabric.js tutorial.


