Fabric.js Tutorial Part 3
Posted by Al Sweigart in misc
Part 3 of a tutorial series on the Fabric.js canvas/graphics library for JavaScript, where we learn how to set the background color of a canvas as well as the shapes fabric.Polygon and fabric.Line.
This is Part 3 of the Fabric.js tutorial. You can see the previous Part 2 or start at the beginning with Part 1.
Drawing a House
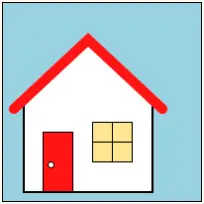
Let's get more practice by drawing this house:
The full code is at https://inventwithpython.com/fabric-js-tutorial/fabric-js-house.html or on JSFiddle. Let's examine each part individually:
<!DOCTYPE html>
<html lang="en">
<head>
  <title>Fabric.js House</title>
  <meta charset="utf-8" />
  <meta name="viewport" content="width=device-width, initial-scale=1.0">
  <script src="https://cdnjs.cloudflare.com/ajax/libs/fabric.js/5.3.1/fabric.min.js"></script>
</head>

<body>
  <!-- The HTML <canvas> element: -->
  <canvas id="houseCanvasId" width="200" height="200" style="border: 1px solid black;"></canvas>
</body>
This is the boilerplate HTML that we've used before in previous tutorial parts. It has a <canvas> element with an id of "houseCanvasId".
<script>
let canvasObj = new fabric.Canvas('houseCanvasId');
canvasObj.backgroundColor = 'lightblue';
To set the background color of the <canvas> element, set the backgroundColor property to an HTML color name or RGB color code. The same color settings we've applied to stroke and fill in the previous tutorials can be used for backgroundColor here.
Avoid setting the CSS background-color property of the <canvas> element when using Fabric.js, as this can causing weird rendering issues such as the background color covering up the entire canvas.
let frame = new fabric.Polygon([
  {x: -65, y: 80}, {x: -65, y: -10}, {x: 0, y: -70}, {x: 65, y: -10}, {x: 65, y:80}], {
  stroke: 'black', strokeWidth: 2, fill: 'white', left: 20, top: 40
});

let roof = new fabric.Polyline([
  {x: -75, y: -8}, {x: 0, y: -78}, {x: 75, y: -8}], {
  stroke: 'red', strokeWidth: 10, strokeLineCap: 'round', fill: 'transparent', left: 6, top: 32
});
We'll create a new fabric.Polygon shape for the white frame of the house and a red fabric.Polyline for the roof. These shapes are similar: the difference between them is that a fabric.Polygon shape automatically draws one more line from its last point to its first point. A fabric.Polyline will not do this, although both shapes will fill their interior spaces with color. This is why the red roof needs to have a fill property of 'transparent', otherwise it draws a black (the default fill color in Fabric.js) triangle.
let door = new fabric.Rect({
  left: 40, top: 130, width: 30, height: 60, stroke: 'black', fill: 'red'
});

let doorKnob = new fabric.Circle({
  radius: 3, stroke: 'black', fill: 'white', left: 45, top: 160
});

let windowFrame = new fabric.Rect({
  left: 90, top: 120, width: 40, height: 40, stroke: 'black', fill: '#fdea96'
});
The door, door knob, and window are made from the circle and rectangle shapes we've created in earlier parts of this tutorial.
let windowVerticalLine = new fabric.Line([110, 120, 110, 160], {stroke: 'black'});

let windowHorizontalLine = new fabric.Line([90, 140, 130, 140], {stroke: 'black'});
The two lines across the yellow window are created with fabric.Line shapes. The first argument to fabric.Line() is an array of four numbers for the start and end points of the line: [x1, y1, x2, y2] followed by the usual object of settings. As with the array-of-points argument to fabric.Polyline() and fabric.Polyon(), you can use the <canvas> element's coordinate system and leave the left and top arguments at their default of 0.
canvasObj.add(frame);
canvasObj.add(roof);
canvasObj.add(door);
canvasObj.add(doorKnob);
canvasObj.add(windowFrame);
canvasObj.add(windowVerticalLine);
canvasObj.add(windowHorizontalLine);
</script>
</html>
As in previous tutorial parts, the shape objects we created won't appear on the canvas until we call the add() method for them.
This tutorial continues on to Part 4. Special thanks to Hunor Márton Borbély for the SVG tutorial that inspired this Fabric.js tutorial.


