Fabric.js Tutorial Part 5
Posted by Al Sweigart in misc
Part 5 of a tutorial series on the Fabric.js canvas/graphics library for JavaScript, where we learn about grouping, cloning, and rotating shapes.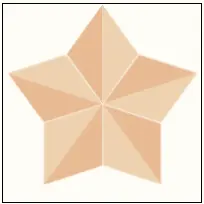
This is Part 5 of the Fabric.js tutorial. You can see the previous Part 4 or start at the beginning with Part 1.
In this tutorial, we'll draw a star shape. Instead of writing the code to draw every part of the star, we'll instead create one of the five "shards" of the star and then group, clone, and rotate it. The final image will look like this:
The full code for this star is at at https://inventwithpython.com/fabric-js-tutorial/fabric-js-star-complete.html or on JSFiddle. Let's examine each part individually:
Drawing a Single Shard of a Star
Let's start by drawing a single shard out of two polygons:
Here is the code for drawing this shard:
<!DOCTYPE html>
<html lang="en">
<head>
  <title>Fabric.js Drawing Stars</title>
  <meta charset="utf-8" />
  <meta name="viewport" content="width=device-width, initial-scale=1.0">
  <script src="https://cdnjs.cloudflare.com/ajax/libs/fabric.js/5.3.1/fabric.min.js"></script>
</head>

<body>
  <!-- The HTML <canvas> element: -->
  <canvas id="starCanvasId" width="200" height="200" style="border: 1px solid black;"></canvas>
</body>
This is the standard boilerplate HTML that we've used before, with a <canvas> element that has an id of "starCanvasId".
<script>
let starCanvasObj = new fabric.Canvas('starCanvasId');

// Create two polygons for a star shard:
let shardHalf1 = new fabric.Polygon([
  {x: 0, y: 0}, {x: 36, y: -50}, {x: 0, y: -100}], {
  left: 100, top: 0, fill: "#EDD8B7"
});
This is the polygon for the right-side triangle. The X and Y coordinates I provide here are later shifted by the left and top settings for the shape.
let shardHalf2 = new fabric.Polygon([
  {x: 0, y: 0}, {x: -36, y: -50}, {x: 0, y: -100}], {
  left: 64, top: 0, fill: "#E5C39C"
});

starCanvasObj.add(shardHalf1);
starCanvasObj.add(shardHalf2);
</script>
</html>
This is the polygon for the left-side triangle. Just to display these shards on the canvas, we call the add() method. Notice that you can select these shards individually on the canvas. In the next section, we will group these two polygons into a single shape.
Putting the Star Shard Triangles into a Group
One way to make Fabric.js shapes easier to work with is by grouping them together. For a complex drawing, you can then rotate, scale, and transform it as a single group. Notice that in the following canvas, you can click on the unified group rather than the individual shards:
Let's look at the parts of this code individually:
<!DOCTYPE html>
<html lang="en">
<head>
  <title>Fabric.js Putting Shards into a Group</title>
  <meta charset="utf-8" />
  <meta name="viewport" content="width=device-width, initial-scale=1.0">
  <script src="https://cdnjs.cloudflare.com/ajax/libs/fabric.js/5.3.1/fabric.min.js"></script>
</head>

<body>
  <!-- The HTML <canvas> element: -->
  <canvas id="starCanvasId" width="200" height="200" style="border: 1px solid black;"></canvas>
</body>

<script>
let starCanvasObj = new fabric.Canvas('starCanvasId');

// Create two polygons for a star shard:
let shardHalf1 = new fabric.Polygon([
  {x: 0, y: 0}, {x: 36, y: -50}, {x: 0, y: -100}], {
  left: 100, top: 0, fill: "#EDD8B7"
});

let shardHalf2 = new fabric.Polygon([
  {x: 0, y: 0}, {x: -36, y: -50}, {x: 0, y: -100}], {
  left: 64, top: 0, fill: "#E5C39C"
});
This is the standard boilerplate HTML along with the previous code creating two polygons for the star shard.
// Create a group of the two shard halves:
let shardGroup = new fabric.Group([shardHalf1, shardHalf2], {
  centeredRotation: false, originX: 'center', originY: 'bottom'
});
starCanvasObj.add(shardGroup);

</script>
</html>
To group multiple shapes, whether Polygon, Rect, Circle, Path, or others, you can pass them in an array as the first argument to fabric.Group(). In our example, we are passing [shardHalf1, shardHalf2] to fabric.Group() to return a new Group object that contains these two shapes.
The second argument to this function is a JavaScript object of settings similar to the one you pass to shapes. In our example, we'll set centeredRotation to false because later when we rotate the group, we want it to rotate around the bottom-center point of the shape instead of the center. To specify the bottom-center point (as opposed to any other point or corner of the shape), we also set originX to 'center' and originY to 'bottom'.
This sets us up for cloning and rotating the star shard group in the next section.
Cloning and Rotating Star Shards
To create the complete star shape, we will clone the group we've created, then rotate the shard group in 72 degree increments and clone it again. The end result will be five star shard groups (you can select them in this canvas):
Let's examine each part of this code individually:
<!DOCTYPE html>
<html lang="en">
<head>
  <title>Fabric.js Cloning Star Shards</title>
  <meta charset="utf-8" />
  <meta name="viewport" content="width=device-width, initial-scale=1.0">
  <script src="https://cdnjs.cloudflare.com/ajax/libs/fabric.js/5.3.1/fabric.min.js"></script>
</head>

<body>
  <!-- The HTML <canvas> element: -->
  <canvas id="starCanvasId" width="200" height="200" style="border: 1px solid black;"></canvas>
</body>


<script>
let canvasObj = new fabric.Canvas('starCanvasId');

// Create two polygons for a star shard:
let shardHalf1 = new fabric.Polygon([
  {x: 0, y: 0}, {x: 36, y: -50}, {x: 0, y: -100}], {
  left: 100, top: 0, fill: "#EDD8B7"
});

let shardHalf2 = new fabric.Polygon([
  {x: 0, y: 0}, {x: -36, y: -50}, {x: 0, y: -100}], {
  left: 64, top: 0, fill: "#E5C39C"
});

// Create a group of the two shard halves:
let shardGroup = new fabric.Group([shardHalf1, shardHalf2], {
  originX: 'center', originY: 'bottom', centeredRotation: false
});
canvasObj.add(shardGroup);
Here is the boilerplate HTML and JavaScript from the previous section. It creates the star shard and then groups it as a Group object in the shardGroup variable.
// Create an array to hold the cloned groups:
let clonedGroups = [];
for (let rotAmount of [0, 72, -72, 144, -144]) {
  shardGroup.rotate(rotAmount);

  shardGroup.clone(function(clonedObj) {
    canvasObj.add(clonedObj);
    clonedGroups.push(clonedObj);
  });
}
canvasObj.remove(shardGroup);
</script>
</html>
Inside of a for...of loop, we rotate the shard group by calling the rotate() method at 0, 72, -72, 144, and -144 degrees. At each of these rotations, we create a duplicate of the shardGroup by calling the clone() method.
The clone() method is rather frustrating. Instead of returning the cloned object, you must pass a callback function to the method which is then called with the newlycreated clone. In our callback function, we call add() so that the cloned object (now in its rotated position) appears on the canvas.
To ensure that we'll have access to this cloned object for later use, we also add it to the clonedGroups array. This program doesn't make use of this array, but it could be handy if you wanted to later have access to the cloned shard groups.
With five clones for the five shards of the star, we don't need the original group in shardGroup anymore. We can remove it from the canvas by calling canvasObj.remove(shardGroup). This is sort of the opposite of canvasObj.add(shardGroup). (In fact, it was unnecessary to add the original shard group to the canvas in the first place. But I wanted to introduce the remove() method to compliment the add() method.)
This tutorial continues on to Part 6. Special thanks to Hunor Márton Borbély for the SVG tutorial that inspired this Fabric.js tutorial.