
Use this link to get 70% off the Automate the Boring Stuff online video course.
Support me on Patreon


Now that you’ve learned some pygame skills, we’ll write a program to animate boxes that bounce around a window. The boxes are different colors and sizes and move only in diagonal directions. To animate the boxes, we’ll move them a few pixels on each iteration through the game loop. This will make it look like the boxes are moving around the screen.
When you run the Animation program, it will look something like Figure 18-1. The blocks will be bouncing off the edges of the window.
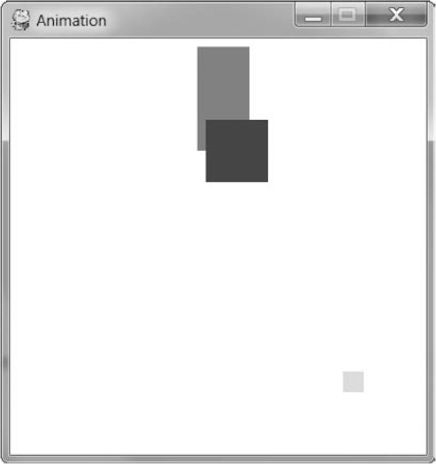
Figure 18-1: A screenshot of the Animation program
Enter the following program into the file editor and save it as animation.py. If you get errors after typing in this code, compare the code you typed to the book’s code with the online diff tool at https://www.nostarch.com/inventwithpython#diff.
animation.py
1. import pygame, sys, time
2. from pygame.locals import *
3.
4. # Set up pygame.
5. pygame.init()
6.
7. # Set up the window.
8. WINDOWWIDTH = 400
9. WINDOWHEIGHT = 400
10. windowSurface = pygame.display.set_mode((WINDOWWIDTH, WINDOWHEIGHT),
0, 32)
11. pygame.display.set_caption('Animation')
12.
13. # Set up direction variables.
14. DOWNLEFT = 'downleft'
15. DOWNRIGHT = 'downright'
16. UPLEFT = 'upleft'
17. UPRIGHT = 'upright'
18.
19. MOVESPEED = 4
20.
21. # Set up the colors.
22. WHITE = (255, 255, 255)
23. RED = (255, 0, 0)
24. GREEN = (0, 255, 0)
25. BLUE = (0, 0, 255)
26.
27. # Set up the box data structure.
28. b1 = {'rect':pygame.Rect(300, 80, 50, 100), 'color':RED, 'dir':UPRIGHT}
29. b2 = {'rect':pygame.Rect(200, 200, 20, 20), 'color':GREEN, 'dir':UPLEFT}
30. b3 = {'rect':pygame.Rect(100, 150, 60, 60), 'color':BLUE, 'dir':DOWNLEFT}
31. boxes = [b1, b2, b3]
32.
33. # Run the game loop.
34. while True:
35. # Check for the QUIT event.
36. for event in pygame.event.get():
37. if event.type == QUIT:
38. pygame.quit()
39. sys.exit()
40.
41. # Draw the white background onto the surface.
42. windowSurface.fill(WHITE)
43.
44. for b in boxes:
45. # Move the box data structure.
46. if b['dir'] == DOWNLEFT:
47. b['rect'].left -= MOVESPEED
48. b['rect'].top += MOVESPEED
49. if b['dir'] == DOWNRIGHT:
50. b['rect'].left += MOVESPEED
51. b['rect'].top += MOVESPEED
52. if b['dir'] == UPLEFT:
53. b['rect'].left -= MOVESPEED
54. b['rect'].top -= MOVESPEED
55. if b['dir'] == UPRIGHT:
56. b['rect'].left += MOVESPEED
57. b['rect'].top -= MOVESPEED
58.
59. # Check whether the box has moved out of the window.
60. if b['rect'].top < 0:
61. # The box has moved past the top.
62. if b['dir'] == UPLEFT:
63. b['dir'] = DOWNLEFT
64. if b['dir'] == UPRIGHT:
65. b['dir'] = DOWNRIGHT
66. if b['rect'].bottom > WINDOWHEIGHT:
67. # The box has moved past the bottom.
68. if b['dir'] == DOWNLEFT:
69. b['dir'] = UPLEFT
70. if b['dir'] == DOWNRIGHT:
71. b['dir'] = UPRIGHT
72. if b['rect'].left < 0:
73. # The box has moved past the left side.
74. if b['dir'] == DOWNLEFT:
75. b['dir'] = DOWNRIGHT
76. if b['dir'] == UPLEFT:
77. b['dir'] = UPRIGHT
78. if b['rect'].right > WINDOWWIDTH:
79. # The box has moved past the right side.
80. if b['dir'] == DOWNRIGHT:
81. b['dir'] = DOWNLEFT
82. if b['dir'] == UPRIGHT:
83. b['dir'] = UPLEFT
84.
85. # Draw the box onto the surface.
86. pygame.draw.rect(windowSurface, b['color'], b['rect'])
87.
88. # Draw the window onto the screen.
89. pygame.display.update()
90. time.sleep(0.02)
In this program, we’ll have three boxes of different colors moving around and bouncing off the walls of a window. In the next chapters, we’ll use this program as a base to make a game in which we control one of the boxes. To do this, first we need to consider how we want the boxes to move.
Each box will move in one of four diagonal directions. When a box hits the side of the window, it should bounce off and move in a new diagonal direction. The boxes will bounce as shown in Figure 18-2.

Figure 18-2: How boxes will bounce
The new direction that a box moves after it bounces depends on two things: which direction it was moving before the bounce and which wall it bounced off. There are eight possible ways a box can bounce: two different ways for each of the four walls. For example, if a box is moving down and right and then bounces off the bottom edge of the window, we want the box’s new direction to be up and right.
We can use a Rect object to represent the position and size of the box, a tuple of three integers to represent the color of the box, and an integer to represent which of the four diagonal directions the box is currently moving in.
The game loop will adjust the x- and y-position of the box in the Rect object and draw all the boxes on the screen at their current position on each iteration. As the program execution iterates over the loop, the boxes will gradually move across the screen so that it looks like they’re smoothly moving and bouncing around.
Lines 1 to 5 are just setting up our modules and initializing pygame as we did in Chapter 17:
1. import pygame, sys, time
2. from pygame.locals import *
3.
4. # Set up pygame.
5. pygame.init()
6.
7. # Set up the window.
8. WINDOWWIDTH = 400
9. WINDOWHEIGHT = 400
10. windowSurface = pygame.display.set_mode((WINDOWWIDTH, WINDOWHEIGHT),
0, 32)
11. pygame.display.set_caption('Animation')
At lines 8 and 9, we define the two constants for the window width and height, and then in line 10, we use those constants to set up windowSurface, which will represent our pygame window. Line 11 uses set_caption() to set the window’s caption to 'Animation'.
In this program, you’ll see that the size of the window’s width and height is used for more than just the call to set_mode(). We’ll use constant variables so that if you ever want to change the size of the window, you only have to change lines 8 and 9. Since the window width and height never change during the program’s execution, constant variables are a good idea.
We’ll use constant variables for each of the four directions the boxes can move in:
13. # Set up direction variables.
14. DOWNLEFT = 'downleft'
15. DOWNRIGHT = 'downright'
16. UPLEFT = 'upleft'
17. UPRIGHT = 'upright'
You could have used any value you wanted for these directions instead of using a constant variable. For example, you could use the string 'downleft' directly to represent the down and left diagonal direction and retype the string every time you need to specify that direction. However, if you ever mistyped the 'downleft' string, you’d end up with a bug that would cause your program to behave strangely, even though the program wouldn’t crash.
If you use constant variables instead and accidentally mistype the variable name, Python will notice that there’s no variable with that name and crash the program with an error. This would still be a pretty bad bug, but at least you would know about it immediately and could fix it.
We also create a constant variable to determine how fast the boxes should move:
19. MOVESPEED = 4
The value 4 in the constant variable MOVESPEED tells the program how many pixels each box should move on each iteration through the game loop.
Lines 22 to 25 set up constant variables for the colors. Remember, pygame uses a tuple of three integer values for the amounts of red, green, and blue, called an RGB value. The integers range from 0 to 255.
21. # Set up the colors.
22. WHITE = (255, 255, 255)
23. RED = (255, 0, 0)
24. GREEN = (0, 255, 0)
25. BLUE = (0, 0, 255)
Constant variables are used for readability, just as in the pygame Hello World program.
Next we’ll define the boxes. To make things simple, we’ll set up a dictionary as a data structure (see “The Dictionary Data Type” on page 112) to represent each moving box. The dictionary will have the keys 'rect' (with a Rect object for a value), 'color' (with a tuple of three integers for a value), and 'dir' (with one of the direction constant variables for a value). We’ll set up just three boxes for now, but you can set up more boxes by defining more data structures. The animation code we’ll use later can be used to animate as many boxes as you define when you set up your data structures.
The variable b1 will store one of these box data structures:
27. # Set up the box data structure.
28. b1 = {'rect':pygame.Rect(300, 80, 50, 100), 'color':RED, 'dir':UPRIGHT}
This box’s top-left corner is located at an x-coordinate of 300 and a y-coordinate of 80. It has a width of 50 pixels and a height of 100 pixels. Its color is RED, and its initial direction is UPRIGHT.
Lines 29 and 30 create two more similar data structures for boxes that are different sizes, positions, colors, and directions:
29. b2 = {'rect':pygame.Rect(200, 200, 20, 20), 'color':GREEN, 'dir':UPLEFT}
30. b3 = {'rect':pygame.Rect(100, 150, 60, 60), 'color':BLUE, 'dir':DOWNLEFT}
31. boxes = [b1, b2, b3]
If you needed to retrieve a box or value from the list, you could do so using indexes and keys. Entering boxes[0] would access the dictionary data structure in b1. If we entered boxes[0]['color'], that would access the 'color' key in b1, so the expression boxes[0]['color'] would evaluate to (255, 0, 0). You can refer to any of the values in any of the box data structures by starting with boxes. The three dictionaries, b1, b2, and b3, are then stored in a list in the boxes variable.
The game loop handles animating the moving boxes. Animations work by drawing a series of pictures with slight differences that are shown one right after another. In our animation, the pictures will be of the moving boxes and the slight differences will be in each box’s position. Each box will move by 4 pixels in each picture. The pictures are shown so fast that the boxes will look like they are moving smoothly across the screen. If a box hits the side of the window, then the game loop will make the box bounce by changing its direction.
Now that we know a little bit about how the game loop will work, let’s code it!
When the player quits by closing the window, we need to stop the program in the same way we did the pygame Hello World program. We need to do this in the game loop so that our program is constantly checking whether there has been a QUIT event. Line 34 starts the loop, and lines 36 to 39 handle quitting:
33. # Run the game loop.
34. while True:
35. # Check for the QUIT event.
36. for event in pygame.event.get():
37. if event.type == QUIT:
38. pygame.quit()
39. sys.exit()
After that, we want to make sure that windowSurface is ready to be drawn on. Later, we’ll draw each box on windowSurface with the rect() method. On each iteration through the game loop, the code redraws the entire window with new boxes that are located a few pixels over each time. When we do that, we’re not redrawing the whole Surface object; instead, we’re just adding a drawing of the Rect object to windowSurface. But when the game loop iterates to draw all the Rect objects again, it redraws every Rect and doesn’t erase the old Rect drawing. If we just let the game loop keep drawing Rect objects on the screen, we’ll end up with a trail of Rect objects instead of a smooth animation. To avoid that, we need to clear the window for every iteration of the game loop.
In order to do that, line 42 fills the entire Surface with white so that anything previously drawn on it is erased:
41. # Draw the white background onto the surface.
42. windowSurface.fill(WHITE)
Without calling windowSurface.fill(WHITE) to white out the entire window before drawing the rectangles in their new position, you would have a trail of Rect objects. If you want to try it out and see what happens, you can comment out line 42 by putting a # at the beginning of the line.
Once windowSurface is filled, we can start drawing all of our Rect objects.
In order to update the position of each box, we need to iterate over the boxes list inside the game loop:
44. for b in boxes:
Inside the for loop, you’ll refer to the current box as b to make the code easier to type. We need to change each box depending on the direction it is already moving, so we’ll use if statements to figure out the box’s direction by checking the dir key inside the box data structure. Then we’ll change the box’s position depending on the direction the box is moving.
45. # Move the box data structure.
46. if b['dir'] == DOWNLEFT:
47. b['rect'].left -= MOVESPEED
48. b['rect'].top += MOVESPEED
49. if b['dir'] == DOWNRIGHT:
50. b['rect'].left += MOVESPEED
51. b['rect'].top += MOVESPEED
52. if b['dir'] == UPLEFT:
53. b['rect'].left -= MOVESPEED
54. b['rect'].top -= MOVESPEED
55. if b['dir'] == UPRIGHT:
56. b['rect'].left += MOVESPEED
57. b['rect'].top -= MOVESPEED
The new value to set the left and top attributes of each box to depends on the box’s direction. If the direction is either DOWNLEFT or DOWNRIGHT, you want to increase the top attribute. If the direction is UPLEFT or UPRIGHT, you want to decrease the top attribute.
If the box’s direction is DOWNRIGHT or UPRIGHT, you want to increase the left attribute. If the direction is DOWNLEFT or UPLEFT, you want to decrease the left attribute.
The value of these attributes will increase or decrease by the amount of the integer stored in MOVESPEED, which stores how many pixels the boxes move on each iteration through the game loop. We set MOVESPEED on line 19.
For example, if b['dir'] is set to 'downleft', b['rect'].left to 40, and b['rect'].top to 100, then the condition on line 46 will be True. If MOVESPEED is set to 4, then lines 47 and 48 will change the Rect object so that b['rect'].left is 36 and b['rect'].top is 104. Changing the Rect value then causes the drawing code on line 86 to draw the rectangle slightly down and to the left of its previous position.
After lines 44 to 57 have moved the box, we need to check whether the box has gone past the edge of the window. If it has, you want to bounce the box. In the code, this means the for loop will set a new value for the box’s 'dir' key. The box will move in the new direction on the next iteration of the game loop. This makes it look like the box has bounced off the side of the window.
In the if statement on line 60, we determine that the box has moved past the top edge of the window if the top attribute of the box’s Rect object is less than 0:
59. # Check whether the box has moved out of the window.
60. if b['rect'].top < 0:
61. # The box has moved past the top.
62. if b['dir'] == UPLEFT:
63. b['dir'] = DOWNLEFT
64. if b['dir'] == UPRIGHT:
65. b['dir'] = DOWNRIGHT
In that case, the direction will be changed based on which direction the box was moving. If the box was moving UPLEFT, then it will now move DOWNLEFT; if it was moving UPRIGHT, it will now move DOWNRIGHT.
Lines 66 to 71 handle the situation in which the box has moved past the bottom edge of the window:
66. if b['rect'].bottom > WINDOWHEIGHT:
67. # The box has moved past the bottom.
68. if b['dir'] == DOWNLEFT:
69. b['dir'] = UPLEFT
70. if b['dir'] == DOWNRIGHT:
71. b['dir'] = UPRIGHT
These lines check whether the bottom attribute (not the top attribute) is greater than the value in WINDOWHEIGHT. Remember that the y-coordinates start at 0 at the top of the window and increase to WINDOWHEIGHT at the bottom.
Lines 72 to 83 handle the behavior of the boxes when they bounce off the sides:
72. if b['rect'].left < 0:
73. # The box has moved past the left side.
74. if b['dir'] == DOWNLEFT:
75. b['dir'] = DOWNRIGHT
76. if b['dir'] == UPLEFT:
77. b['dir'] = UPRIGHT
78. if b['rect'].right > WINDOWWIDTH:
79. # The box has moved past the right side.
80. if b['dir'] == DOWNRIGHT:
81. b['dir'] = DOWNLEFT
82. if b['dir'] == UPRIGHT:
83. b['dir'] = UPLEFT
Lines 78 to 83 are similar to lines 72 to 77 but check whether the right side of the box has moved past the window’s right edge. Remember, the x-coordinates start at 0 on the window’s left edge and increase to WINDOWWIDTH on the window’s right edge.
Every time the boxes move, we need to draw them in their new positions on windowSurface by calling the pygame.draw.rect() function:
85. # Draw the box onto the surface.
86. pygame.draw.rect(windowSurface, b['color'], b['rect'])
You need to pass windowSurface to the function because it is the Surface object to draw the rectangle on. Pass b['color'] to the function because it is the rectangle’s color. Finally, pass b['rect'] because it is the Rect object with the position and size of the rectangle to draw.
Line 86 is the last line of the for loop.
After the for loop, each box in the boxes list will be drawn, so you need to call pygame.display.update() to draw windowSurface on the screen:
88. # Draw the window onto the screen.
89. pygame.display.update()
90. time.sleep(0.02)
The computer can move, bounce, and draw the boxes so fast that if the program ran at full speed, all the boxes would look like a blur. In order to make the program run slowly enough that we can see the boxes, we need to add time.sleep(0.02). You can try commenting out the time.sleep(0.02) line and running the program to see what it looks like. The call to time.sleep() will pause the program for 0.02 seconds, or 20 milliseconds, between each movement of the boxes.
After this line, execution returns to the start of the game loop and begins the process all over again. This way, the boxes are constantly moving a little, bouncing off the walls, and being drawn on the screen in their new positions.
This chapter has presented a whole new way of creating computer programs. The previous chapters’ programs would stop and wait for the player to enter text. However, in our Animation program, the program constantly updates the data structures without waiting for input from the player.
Remember that we had data structures that would represent the state of the board in our Hangman and Tic-Tac-Toe games. These data structures were passed to a drawBoard() function to be displayed on the screen. Our Animation program is similar. The boxes variable holds a list of data structures representing boxes to be drawn to the screen, and these are drawn inside the game loop.
But without calls to input(), how do we get input from the player? In Chapter 19, we’ll cover how programs know when the player presses keys on the keyboard. We’ll also learn about a new concept called collision detection.