Check out other books by Al Sweigart, free online or available for purchase:

...and other books as well! Or register for the online video course. You can also donate to support the author directly.


The Droste effect is a recursive art technique named after a 1904 illustration on a tin of Droste’s Cacao, a Dutch brand of cocoa. Shown in Figure 14-1, the tin features an image of a nurse holding a meal tray containing a tin of Droste cocoa, which itself bears the illustration.
In this chapter we’ll create a Droste Maker program that can generate similar recursive images from any photograph or drawing you have, whether it be a museum patron looking at an exhibit of themself, a cat in front of a computer monitor of a cat in front of a computer monitor, or something else entirely.
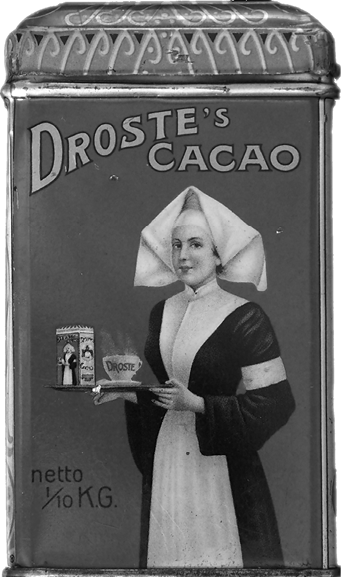
Figure 14-1: The recursive illustration on a tin of Droste’s Cacao
Using a graphics program such as Microsoft Paint or Adobe Photoshop, you’ll prepare the image by covering an area of it with a pure magenta color, indicating where to place the recursive image. The Python program uses the Pillow image library to read this image data and produce a recursive image.
First, we’ll cover how to install the Pillow library and how the Droste Maker algorithm works. Next, we’ll present the Python source code for the program with accompanying explanation of the code.
This chapter’s project requires the Pillow image library. This library allows your Python programs to create and modify image files including PNGs, JPEGs, and GIFs. It has several functions to perform resizing, copying, cropping, and other common actions on images.
To install this library on Windows, open a command prompt window and run py -m pip install --user pillow. To install this library on macOS or Linux, open a Terminal window and run python3 -m pip install --user pillow. This command makes Python use the pip installer program to download the module from the official Python Package Index at https://pypi.org.
To verify that the installation worked, open a Python terminal and run from PIL import Image. (While the library’s name is Pillow, the Python module installed is named PIL, in capital letters.) If no error appears, the library was installed correctly.
The official documentation for Pillow can be found at https://pillow.readthedocs.io.
The next step is to prepare an image by setting a portion of it to the RGB (red, green, blue) color value (255, 0, 255). Computer graphics often use magenta to mark which pixels of an image should be rendered as transparent. Our program will treat these magenta pixels like a green screen in video production, replacing them with a resized version of the initial image. Of course, this resized image will have its own smaller magenta area, which the program will replace with another resized image. The base case occurs when the final image has no more magenta pixels, at which point the algorithm is done.
Figure 14-2 shows the progression of images created as the resized image is recursively applied to the magenta pixels. In this example, a model stands in front of an art museum exhibit that has been replaced with magenta pixels, turning the photograph itself into the exhibit. You can download this base image from https://inventwithpython.com/museum.png.
Be sure you use only the pure (255, 0, 255) magenta color for painting the magenta area in your image. Some tools may have a fading effect that produces a more natural look. For example, Photoshop’s Brush tool will produce faded magenta pixels on the outline of the painted area, so you will need to use the Pencil tool instead, which paints using only the precise pure magenta color you’ve selected. If your graphics program doesn’t allow you to specify the precise RGB color for drawing, you can copy and paste the colors from the PNG image at https://inventwithpython.com/magenta.png.
The magenta area in the image can be of any size or shape; it does not have to be an exact, contiguous rectangle. You can see that in Figure 14-2, the museum visitor cuts into the magenta rectangle, placing them in front of the recursive image.
If you make your own images with Droste Maker, you should use the PNG image file format instead of JPEG. JPEG images use lossy compression techniques to keep the file size small that introduce slight imperfections. These are usually imperceptible to the human eye and don’t affect overall image quality. However, this lossy compression will replace the pure (255, 0, 255) magenta pixels with slightly different shades of magenta. The lossless image compression of PNG images ensures this won’t happen.
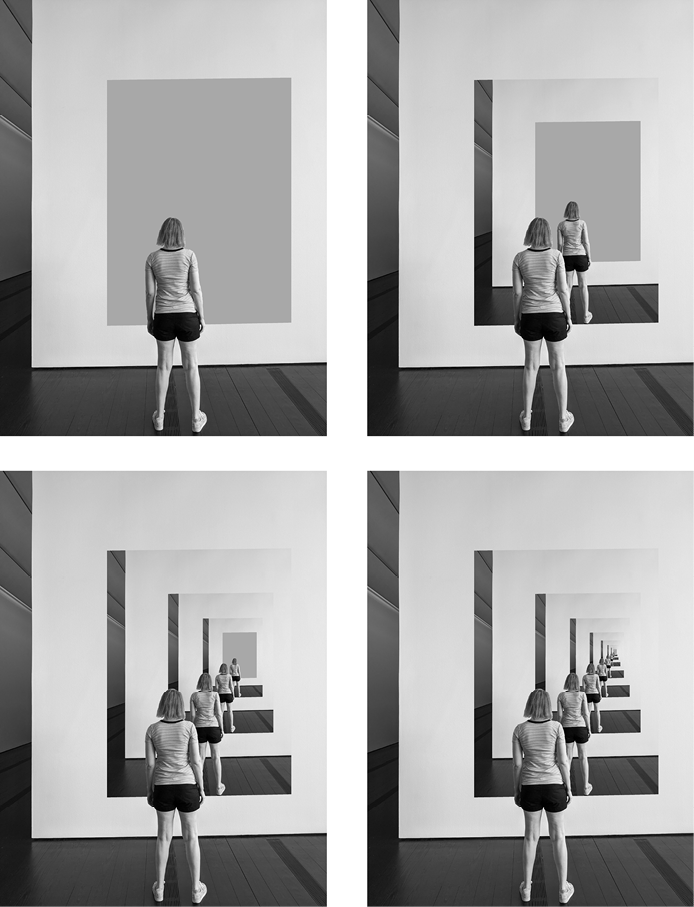
Figure 14-2: Recursive applications of the image to the magenta pixels. If you are viewing the black-and-white image printed in this book, the magenta area is the rectangle in front of the museum visitor.
The following is the source code for drostemaker.py; because this program relies on the Python-only Pillow library, there is no JavaScript equivalent for this project in this book:
from PIL import Image


def makeDroste(baseImage, stopAfter=10):
    # If baseImage is a string of an image filename, load that image:
    if isinstance(baseImage, str):
        baseImage = Image.open(baseImage)

    if stopAfter == 0:
        # BASE CASE
        return baseImage
    # The magenta color has max red/blue/alpha, zero green:
    if baseImage.mode == 'RGBA':
        magentaColor = (255, 0, 255, 255)
    elif baseImage.mode == 'RGB':
        magentaColor = (255, 0, 255)

    # Find the dimensions of the base image and its magenta area:
    baseImageWidth, baseImageHeight = baseImage.size
    magentaLeft = None
    magentaRight = None
    magentaTop = None
    magentaBottom = None

    for x in range(baseImageWidth):
        for y in range(baseImageHeight):
            if baseImage.getpixel((x, y)) == magentaColor:
                if magentaLeft is None or x < magentaLeft:
                    magentaLeft = x
                if magentaRight is None or x > magentaRight:
                    magentaRight = x
                if magentaTop is None or y < magentaTop:
                    magentaTop = y
                if magentaBottom is None or y > magentaBottom:
                    magentaBottom = y

    if magentaLeft is None:
        # BASE CASE - No magenta pixels are in the image.
        return baseImage

    # Get a resized version of the base image:
    magentaWidth = magentaRight - magentaLeft + 1
    magentaHeight = magentaBottom - magentaTop + 1
    baseImageAspectRatio = baseImageWidth / baseImageHeight
    magentaAspectRatio = magentaWidth / magentaHeight

    if baseImageAspectRatio < magentaAspectRatio:
        # Make the resized width match the width of the magenta area:
        widthRatio = magentaWidth / baseImageWidth
        resizedImage = baseImage.resize((magentaWidth,
        int(baseImageHeight * widthRatio) + 1), Image.NEAREST)
    else:
        # Make the resized height match the height of the magenta area:
        heightRatio =  magentaHeight / baseImageHeight
        resizedImage = baseImage.resize((int(baseImageWidth *
        heightRatio) + 1, magentaHeight), Image.NEAREST)

    # Replace the magenta pixels with the smaller, resized image:
    for x in range(magentaLeft, magentaRight + 1):
        for y in range(magentaTop, magentaBottom + 1):
            if baseImage.getpixel((x, y)) == magentaColor:
                pix = resizedImage.getpixel((x - magentaLeft, y - magentaTop))
                baseImage.putpixel((x, y), pix)

    # RECURSIVE CASE:
    return makeDroste(baseImage, stopAfter=stopAfter - 1)


recursiveImage = makeDroste('museum.png')
recursiveImage.save('museum-recursive.png')
recursiveImage.show()
Before you run this program, place your image file in the same folder as drostemaker.py. The program will save the recursive image as museum-recursive.png and then open an image viewer to display it. If you want to run the program on your own image that you’ve added a magenta area to, replace makeDroste('museum.png') at the end of the source code with the name of your image file and save('museum-recursive.png') with the name you’d like to use to save the recursive image.
The Droste Maker program has only one function, makeDroste(), which accepts a Pillow Image object or a string of an image’s filename. The function returns a Pillow Image object with any magenta pixels recursively replaced by a version of the same image:
Python
from PIL import Image


def makeDroste(baseImage, stopAfter=10):
    # If baseImage is a string of an image filename, load that image:
    if isinstance(baseImage, str):
        baseImage = Image.open(baseImage)
The program begins by importing the Image class from the Pillow library (named PIL as a Python module). Within the makeDroste() function, we check whether the baseImage parameter is a string, and if so, we replace it with a Pillow Image object loaded from the corresponding image file.
Next, we check whether the stopAfter parameter is 0. If it is, we’ve reached one of the algorithm’s base cases and the function returns the Pillow Image object of the base image:
Python
    if stopAfter == 0:
        # BASE CASE
        return baseImage
The stopAfter parameter is 10 by default if the function call doesn’t provide one. The recursive call to makeDroste() later in this function passes stopAfter - 1 as the argument for this parameter so that it decreases with each recursive call and approaches the base case of 0.
For example, passing 0 for stopAfter results in the function immediately returning a recursive image identical to the base image. Passing 1 for stopAfter replaces the magenta area with a recursive image once, makes one recursive call, reaches the base case, and immediately returns. Passing 2 for stopAfter causes two recursive calls, and so on.
This parameter prevents the function from recursing until it causes a stack overflow in cases when the magenta area is particularly large. It also lets us pass a smaller argument than 10 to limit the number of recursive images placed in the base image. For example, the four images in Figure 14-2 were created by passing 0, 1, 2, and 3 for the stopAfter parameter.
Next, we check the color mode of the base image. This can be either RGB for an image with red-green-blue pixels or RGBA for an image that has an alpha channel for its pixels. The alpha value tells a pixel’s level of transparency. Here’s the code:
Python
    # The magenta color has max red/blue/alpha, zero green:
    if baseImage.mode == 'RGBA':
        magentaColor = (255, 0, 255, 255)
    elif baseImage.mode == 'RGB':
        magentaColor = (255, 0, 255)
The Droste Maker needs to know the color mode so that it can find magenta pixels. The values for each channel range from 0 to 255, and magenta pixels have a maximum amount of red and blue but no green. Further, if an alpha channel exists, it would be set to 255 for a completely opaque color and 0 for a completely transparent one. The magentaColor variable is set to the correct tuple value for a magenta pixel depending on the image’s color mode given in baseImage.mode.
Before the program can recursively insert the image into the magenta area, it must find the boundaries of the magenta area in the image. This involves finding the leftmost, rightmost, topmost, and bottommost magenta pixels in the image.
While the magenta area itself doesn’t need to be a perfect rectangle, the program needs to know the rectangular boundaries of the magenta in order to properly resize the image for insertion. For example, Figure 14-3 shows a base image of the Mona Lisa with the magenta area outlined in white. The magenta pixels are replaced to produce the recursive image.
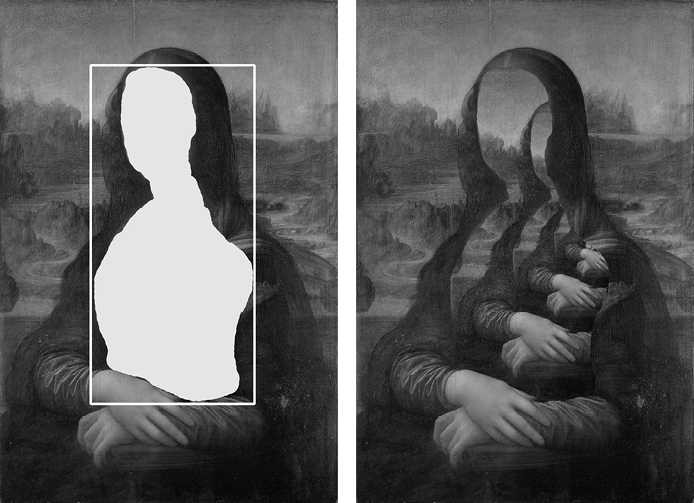
Figure 14-3: The base image with a magenta area outlined in white (left) and the recursive image it produces (right)
To calculate the resizing and placement of the resized image, the program retrieves the width and height of the base image from the size attribute of the Pillow Image object in baseImage. The following lines initialize four variables for the four edges of the magenta area—magentaLeft, magentaRight, magentaTop, and magentaBottom—to the None value:
Python
    # Find the dimensions of the base image and its magenta area:
    baseImageWidth, baseImageHeight = baseImage.size
    magentaLeft = None
    magentaRight = None
    magentaTop = None
    magentaBottom = None
These edge variable values are replaced by integer x and y coordinates in the code that comes next:
Python
    for x in range(baseImageWidth):
        for y in range(baseImageHeight):
            if baseImage.getpixel((x, y)) == magentaColor:
                if magentaLeft is None or x < magentaLeft:
                    magentaLeft = x
                if magentaRight is None or x > magentaRight:
                    magentaRight = x
                if magentaTop is None or y < magentaTop:
                    magentaTop = y
                if magentaBottom is None or y > magentaBottom:
                    magentaBottom = y
These nested for loops iterate the x and y variables over every possible x, y coordinate in the base image. We check whether the pixel at each coordinate is the pure magenta color stored in magentaColor, then update the magentaLeft variable if the coordinates of the magenta pixel are further left than currently recorded in magentaLeft, and so on for the other three directions.
By the time the nested for loops are finished, magentaLeft, magentaRight, magentaTop, and magentaBottom will describe the boundaries of the magenta pixels in the base image. If the image has no magenta pixels, these variables will remain set to their initial None value:
Python
    if magentaLeft is None:
        # BASE CASE - No magenta pixels are in the image.
        return baseImage
If magentaLeft (or really, any of the four variables) is still set to None after the nested for loops complete, no magenta pixels are in the image. This is a base case for our recursive algorithm because the magenta area becomes smaller and smaller with each recursive call to makeDroste(). At this point, the function returns the Pillow Image object in baseImage.
We need to resize the base image to cover the entire magenta area and no more. Figure 14-4 shows the complete resized image overlayed transparently on the original base image. This resized image is cropped so that only the parts over magenta pixels are copied over to the final image.
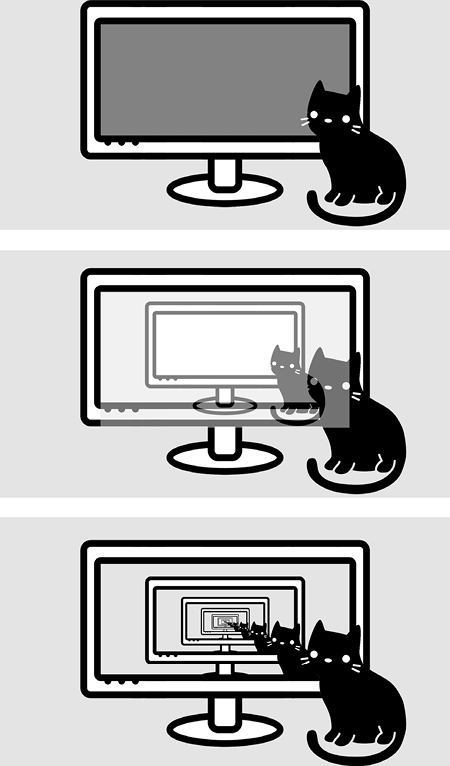
Figure 14-4: The base image with the magenta area in the monitor (top), the resized image over the base image (middle), and the final recursive image that replaces only the magenta pixels (bottom)
We cannot simply resize the base image to the dimensions of the magenta area because it’s unlikely the two share the same aspect ratio, or proportion of the width divided by the height. Doing so results in a recursive image that looks stretched or squished, like Figure 14-5.
Instead, we must make the resized image large enough to completely cover the magenta area but still retain the image’s original aspect ratio. This means either setting the width of the resized image to the width of the magenta area such that the height of the resized image is equal to or larger than the height of the magenta area, or setting the height of the resized image to the height of the magenta area such that the width of the resized image is equal to or larger than the width of the magenta area.
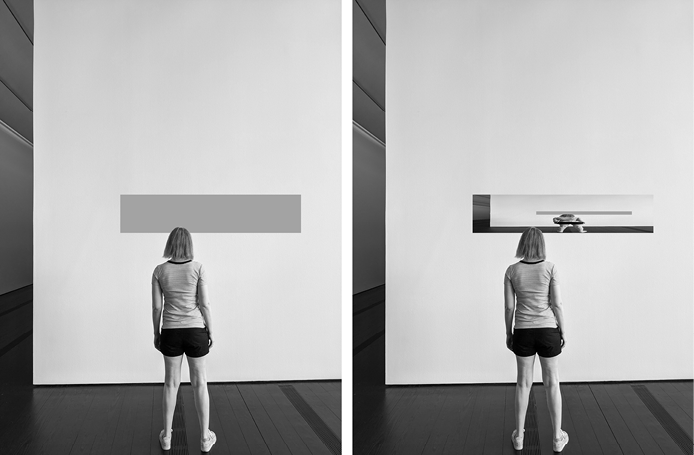
Figure 14-5: Resizing the image to the dimensions of the magenta area can result in a different aspect ratio, causing it to look stretched or squished.
To calculate the correct resizing dimensions, the program needs to determine the aspect ratio of both the base image and the magenta area:
Python
    # Get a resized version of the base image:
    magentaWidth = magentaRight - magentaLeft + 1
    magentaHeight = magentaBottom - magentaTop + 1
    baseImageAspectRatio = baseImageWidth / baseImageHeight
    magentaAspectRatio = magentaWidth / magentaHeight
From magentaRight and magentaLeft, we can calculate the width of the magenta area. The + 1 accounts for a small, necessary adjustment: if the right side of the magenta area was the x-coordinate of 11 and the left side was 10, the width would be two pixels. This is correctly calculated by (magentaRight - magentaLeft + 1), not (magentaRight - magentaLeft).
Because the aspect ratio is the width divided by the height, images with small aspect ratios are taller than they are wide, and those with large aspect ratios are wider than they are tall. An aspect ratio of 1.0 describes a perfect square. The next lines set the dimensions of the resized image after comparing the aspect ratios of the base image and the magenta area:
    if baseImageAspectRatio < magentaAspectRatio:
        # Make the resized width match the width of the magenta area:
        widthRatio = magentaWidth / baseImageWidth
        resizedImage = baseImage.resize((magentaWidth,
        int(baseImageHeight * widthRatio) + 1), Image.NEAREST)
    else:
        # Make the resized height match the height of the magenta area:
        heightRatio =  magentaHeight / baseImageHeight
        resizedImage = baseImage.resize((int(baseImageWidth *
        heightRatio) + 1, magentaHeight), Image.NEAREST)
If the base image’s aspect ratio is less than the magenta area’s aspect ratio, the resized image’s width should match the width of the magenta area. If the base image’s aspect ratio is greater, the resized image’s height should match the height of the magenta area. We then determine the other dimension by multiplying the base image’s height by the width ratio, or the base image’s width by the height ratio. This ensures that the resized image both completely covers the magenta area and remains proportional to its original aspect ratio.
We call the resize() method once to produce a new Pillow Image object resized to match either the width of the base image or the height of the base image. The first argument is a (width, height) tuple for the new image’s size. The second argument is the Image.NEAREST constant from the Pillow library that tells the resize() method to use the nearest neighbor algorithm when resizing the image. This prevents the resize() method from blending the colors of the pixels to produce a smooth image.
We don’t want this, because it could blur the magenta pixels with neighboring non-magenta pixels in the resized image. Our makeDroste() function relies on detecting magenta pixels with the exact RGB color of (255, 0, 255) and would ignore these slightly off magenta pixels. The end result would be a pinkish outline around the magenta areas that would ruin our image. The nearest neighbor algorithm doesn’t do this blurring, leaving our magenta pixels exactly at the (255, 0, 255) magenta color.
Once the base image has been resized, we can place the resized image over the base image. But the pixels from the resized image should be placed over only magenta pixels in the base image. The resized image will be placed such that the top-left corner of the resized image is at the top-left corner of the magenta area:
Python
    # Replace the magenta pixels with the smaller, resized image:
    for x in range(magentaLeft, magentaRight + 1):
        for y in range(magentaTop, magentaBottom + 1):
            if baseImage.getpixel((x, y)) == magentaColor:
                pix = resizedImage.getpixel((x - magentaLeft, y - magentaTop))
                baseImage.putpixel((x, y), pix)
Two nested for loops iterate over every pixel in the magenta area. Remember that the magenta area does not have to be a perfect rectangle, so we check whether the pixel at the current coordinates is magenta. If so, we get the pixel color from the corresponding coordinates in the resized image and place it on the base image. After the two nested for loops have finished looping, the magenta pixels in the base image will have been replaced by pixels from the resized image.
However, the resized image itself could have magenta pixels, and if so, these will now become part of the base image, as in the top-right image of Figure 14-2. We’ll need to pass the modified base image to a recursive makeDroste() call:
Python
    # RECURSIVE CASE:
    return makeDroste(baseImage, stopAfter - 1)
This line is the recursive call in our recursive algorithm, and it’s the last line of code in the makeDroste() function. This recursion handles the new magenta area copied from the resized image. Note that the value passed for the stopAfter parameter is stopAfter - 1, ensuring that it comes closer to the base case of 0.
Finally, the Droste Maker program begins by passing ′museum.png′ to makeDroste() to get the Pillow Image object of the recursive image. We save this as a new image file named museum-recursive.png and display the recursive image in a new window for the user to view:
Python
recursiveImage = makeDroste('museum.png')
recursiveImage.save('museum-recursive.png')
recursiveImage.show()
You can change these filenames to whichever image on your computer you’d like to use with the program.
Does the makeDroste() function need to be implemented with recursion? Simply put, no. Notice that no tree-like structure is involved in the problem, and the algorithm does no backtracking, which is a sign that recursion may be an overengineered approach to this code.
This chapter’s project was a program that produces recursive Droste effect images, just like the illustration on old tins of Droste’s Cacao. The program works by using pure magenta pixels with RGB values of (255, 0, 255) to mark the parts of the image that should be replaced by a smaller version. Since this smaller version will also have its own smaller magenta area, the replacements will repeat until the magenta area is gone to produce a recursive image.
The base case for our recursive algorithm occurs when no more magenta pixels remain in the image to place the smaller recursive image in, or when the stopAfter counter reaches 0. Otherwise, the recursive case passes the image to the makeDroste() function to continue to replace the magenta area with even smaller recursive images.
You can modify your own photos to add magenta pixels and then run them through the Droste Maker. The museum patron looking at an exhibit of themself, the cat in front of a computer monitor of the cat in front of a computer monitor, and the faceless Mona Lisa images are just a few examples of the surreal possibilities you can create with this recursive program.
The Wikipedia article for the Droste effect at https://en.wikipedia.org/wiki/Droste_effect has examples of products other than Droste’s Cacao that use the Droste effect. Dutch artist M.C. Escher’s Print Gallery is a famous example of a scene that also contains itself, and you can learn more about it at https://en.wikipedia.org/wiki/Print_Gallery_(M._C._Escher).
In a video titled “The Neverending Story (and Droste Effect)” on the Numberphile YouTube channel, Dr. Clifford Stoll discusses recursion and the Droste’s Cacao box art at https://youtu.be/EeuLDnOupCI.
Chapter 19 of my book Automate the Boring Stuff with Python, 2nd edition (No Starch Press, 2019) provides a basic tutorial of the Pillow library at https://automatetheboringstuff.com/2e/chapter19.